Use the email marketing software EmailOctopus and your website to collect newsletter subscriptions. With our plugin you can integrate EmailOctopus in different ways:
- Via the checkout page of your webshop with WooCommerce
- Using a form widget in Elementor Pro
- Place a form on every page using a shortcode
Do you need support for this plugin? Please post your question via the plugin support forum at wordpress.org.
General plugin installation
The installation of the plugin is the same as with any other plugin that you can install via the WordPress repository.
- Go to Plugins > Add new plugin via your dashboard and search for “EO4WP”.
- Install and activate the plugin that appears.
Before you go any further…
To further install the plugin, you need to create an EmailOctopus API key. Don’t have an EmailOctopus account yet? Follow this link and create a new account. With the free version of EmailOctopus you can add 2,500 subscribers and send 10,000 emails per month.
Once your account is active, you can also create an API key. Go to Integrations & API via the menu at the top right and then click Manage to the right from the list item named API. Then click the Create key button on the next page. Enter a descriptive name and click Create. Copy or download the API key via the pop-up that appears.
- With the API key you now go to Settings > EO4WP. On this page, first paste the API key in the top field and click Save.
- Now you can choose the default mailing list in the second options field. Do you use more than one list? You can always choose a different list for the different integrations.
- The following fields are for integration with a shortcode.
- Custom fields -If you want to use extra fields within your forms, enter them here. Enter the field name (the “Tag” value in EmailOctopus) and label per line.
- Text for subscribe checkbox – The default text that appears next to the newsletter subscription box. You can read more about this option in the explanation of the shortcodes.
- Include CSS – Check this to use the plugin’s CSS code. Uncheck this box if you only want to use the style of your theme.
- Incl. JS/CSS sitewide – By default, these files are only added when the shortcode is used within a post or page. If you use a shortcode elsewhere, for example in the code of your theme, this check mark is necessary for the form to work.
- GDPR text = Enter your own text/link for the GDPR field. Make sure that you do not delete or break the link HTML code.
- Track in Google Analytics – Enter a value here for tracking an event in Google Analytics v4.
- Track in Clicky – Create a Goal in Clicky and enter the goal ID here.
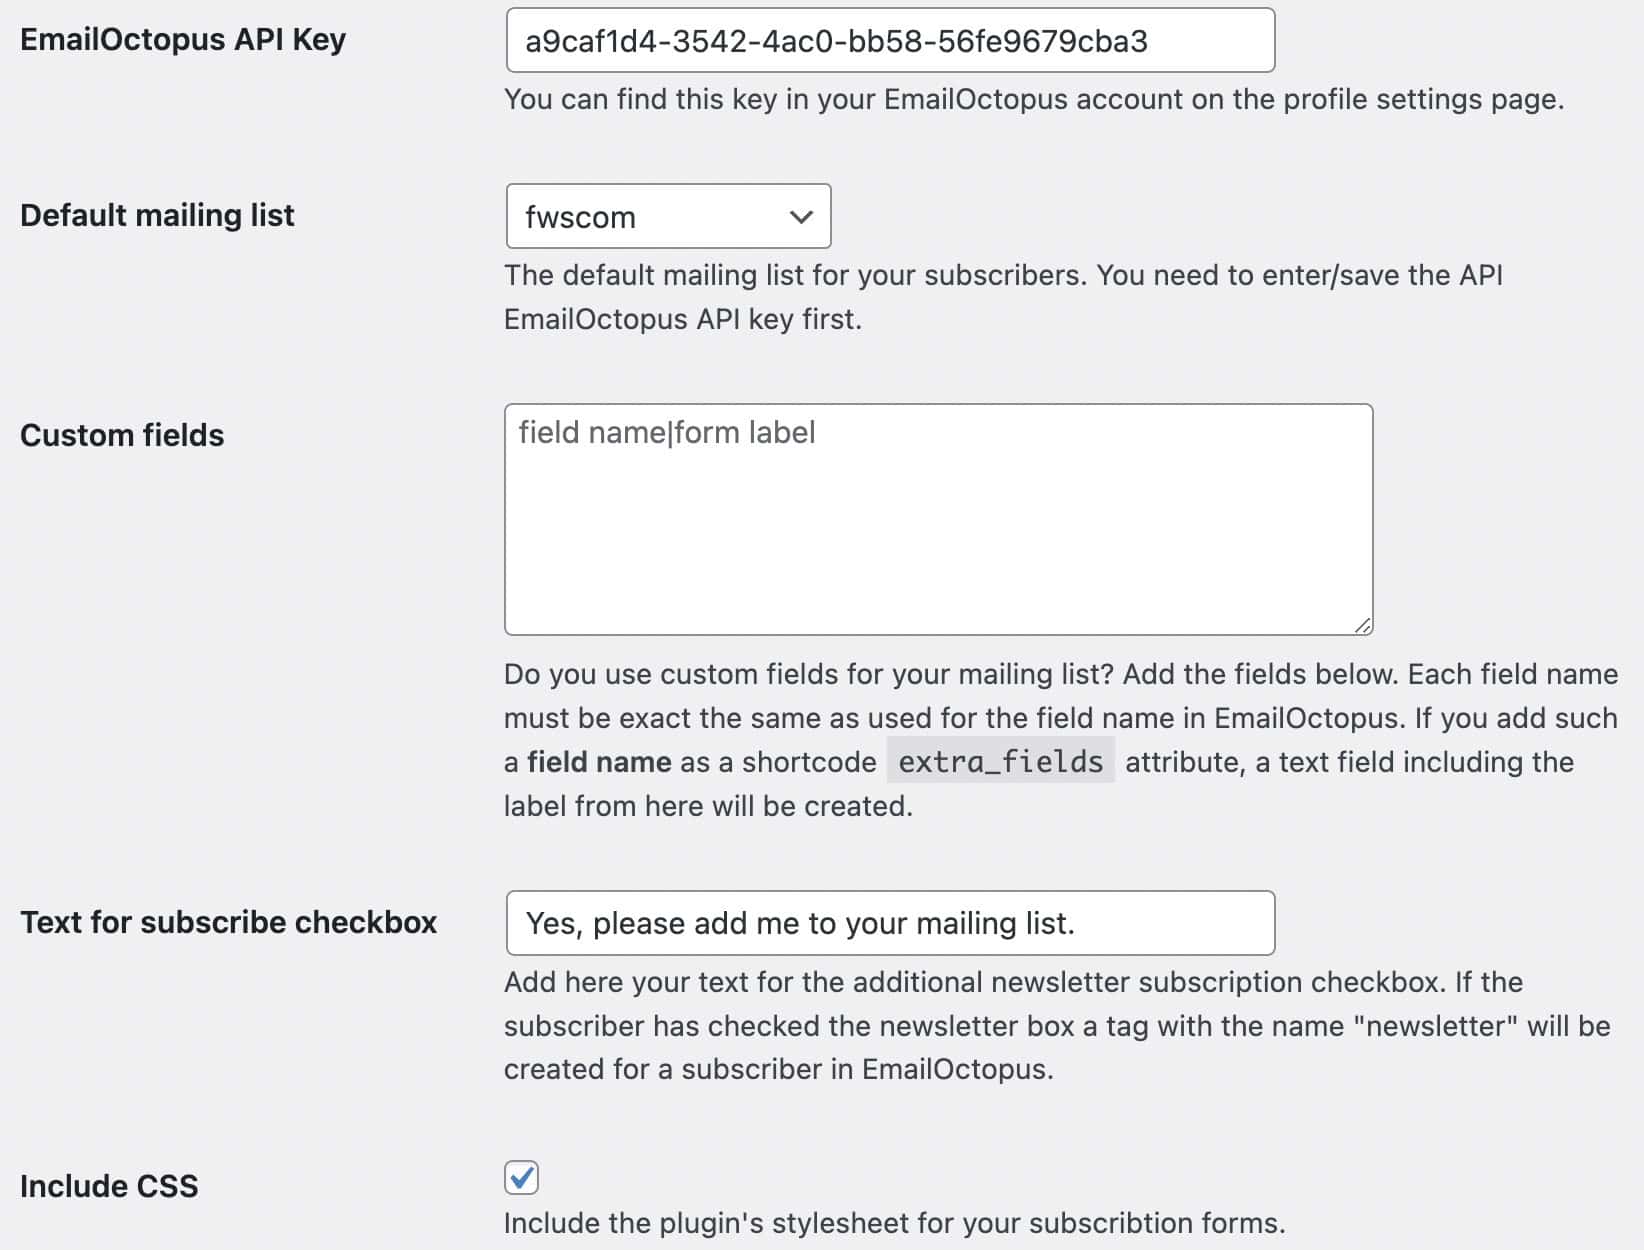
General settings
Are you using the integration for Elementor or WooCommerce? Then these settings do not apply. There are certainly other ways to track in Google Analytics or Clicky, but unfortunately the plugin currently does not support this.
WooCommerce integration
With the EmailOctopus integration for WooCommerce, it’s possible to enable a subscription option right on your checkout page. For the configuration you need to follow these steps:
- Goto WooCommerce > Settings > Integrations > EmailOctopus
- Choose the Mailing list you prefer for the subscription feature on your checkout page.
- Check the other features to include additional order information with each subscription. You can this information in EmailOctopus for the segmentation of your mailing list(s).
- Position – Where do you want to place the registration box for your newsletter?
- Subscription label – The label text for the registration box
- Store product categories – With this option, the product categories of the ordered products are sent as tags to EmailOctopus
- Store coupon – This option creates a tag for the subscriber called “coupon”
- Last order – Check this box so that the order date is communicated. A custom field is created (one time) in EmailOctopus for the date.
- Submit language – Does your store have more than 1 language? Then also provide the language code so that you can send your automation emails based on the language.
- Enable the option “Subscribe everyone” if you like to use EmailOctopus for non-commercial emails (too). Check the additional information in the “Advanced usage” section.
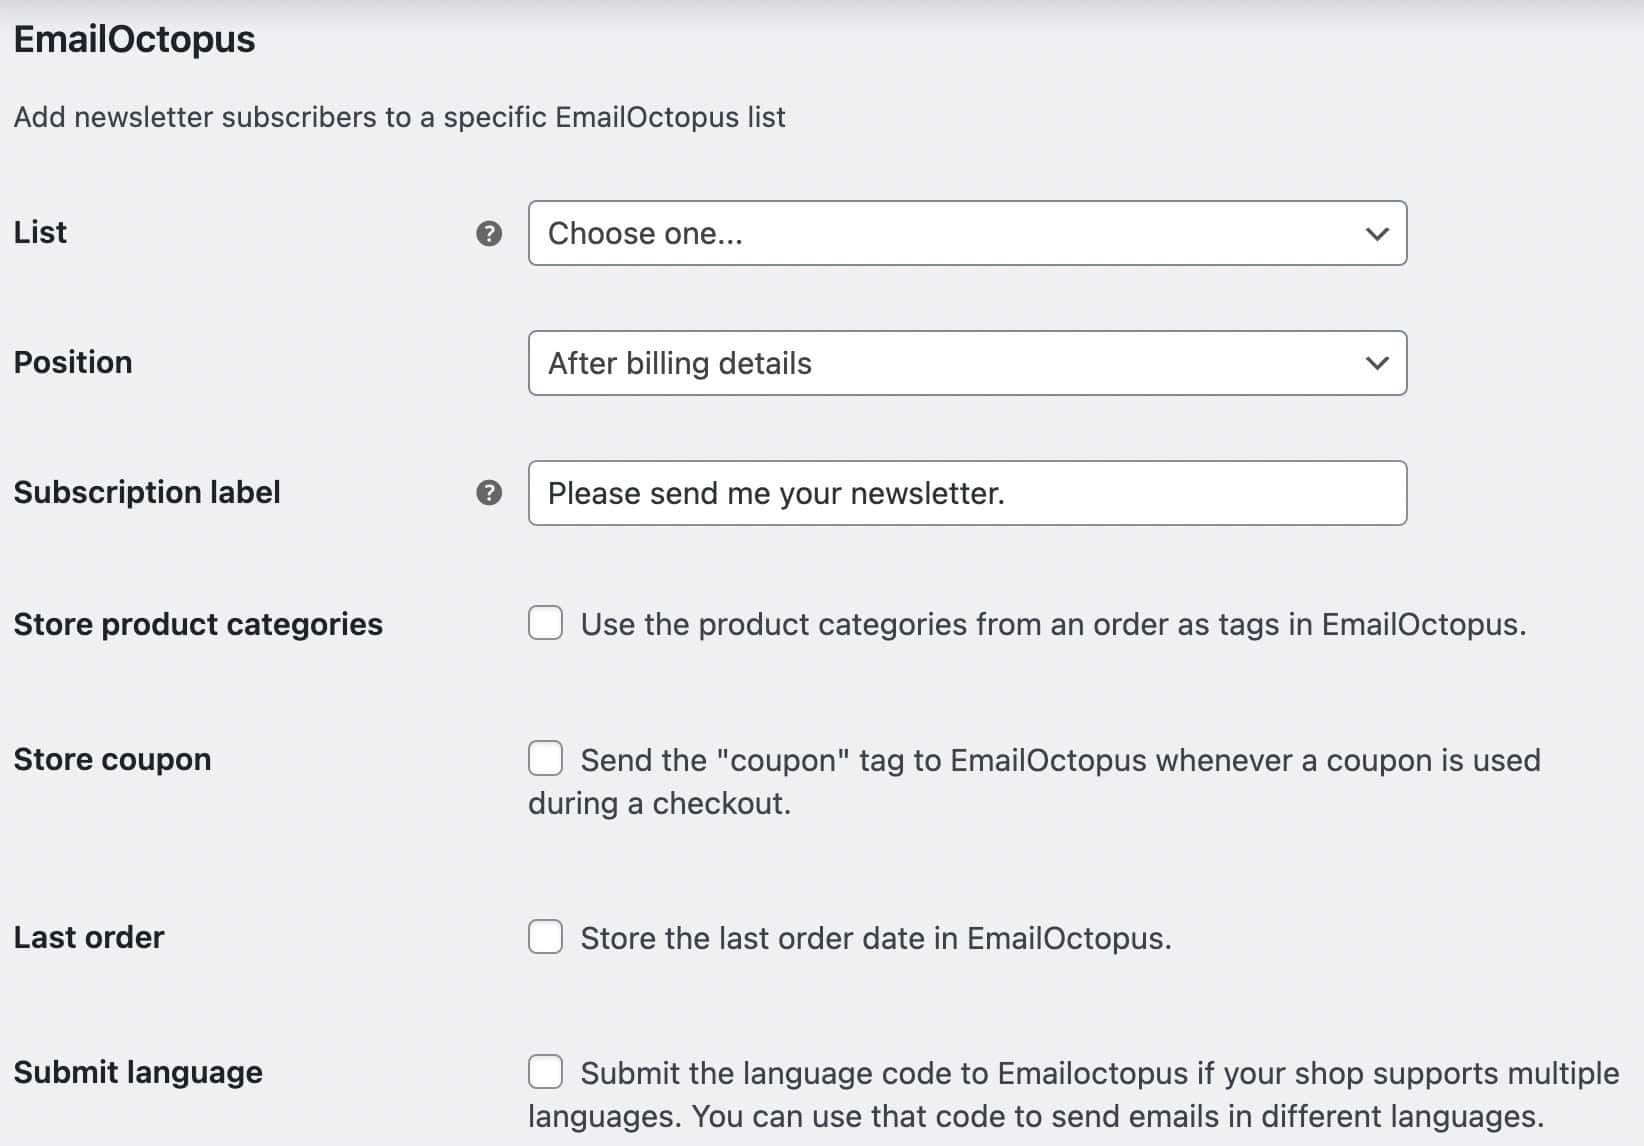
WooCommerce settings
Elementor integration
If you use Elementor Pro, it’s possible to add the EmailOctopus subscription as form action. There is a limit of seven pre-defined list fields you can use for the Elementor integration. If you use more or other list fields, please use the shortcode option instead. These are the steps to configure the EmailOctopus form action:
- Create your Elementor form as usual and choose “EmailOctopus” from Actions after submit tab.
- Select the mailing list you want to use.
- Now point the different mailing list fields to the form fields, by choosing the (EmailOctopus) field from the select menu and by entering the form field ID (check advanced tab from each form field).
- If your form has an additional newsletter sign-up box (form field), enter the form field ID along with the newsletter option from the selection menu. This connection creates a tag called “newsletter” for the subscriber in your mailing list.
- Optionally it’s possible to add extra tags to your form EmailOctopus form action. Enter one or more tags and the integration will add them together with the subscription.
Shortcode
With the plugin shortcode you can easily create a subscription form. Are you not building your website with Elementor? Then this function is definitely recommended. You can of course also use the shortcode together with Elementor.
Shortcode attributes
title
The title above the form. Leave an empty value to not show a title. The default value is “Subscribe now!”
description
Use this attribute for a short description between the title and the form. The default value is “Subscribe today and get future blog posts your email.”
gdpr_text
This text with a link to your privacy statement is shown at the bottom of the form. By default this is retrieved via the settings page, but you can also enter your own text/link for each form.
btnlabel
The label for the submit button, the default value is “Subscribe”.
thank_you_text
Use this attribute for your own thank you text. If you do not use your own text, this standard texts will be used:
Including newsletter registration: Thanks, for joining our mailing list!
If you use only the reporting option: Thanks, for your interest.
report_only
This option has three settings:
y = Sends the report and processes the registration in EmailOctopus
o = Only sends the report via email
n = Disables the reporting function
btnclass
Enter the name of an additional CSS class here. You can then use this to format the button with your own CSS code.
listid
Enter a different mailing list ID here. You can find the ID in EmailOctopus via the Settings tab in the selected list. If you do not use the attribute, the default list from the plugin settings page will be used.
icon
If you have enabled the option for FontAwesome, you can specify 1 of several solid icons here. For example, “fa-arrow-down”. Visit the FontAwesome website and view all Solid Icons that are available with the free version. Have you already enabled FontAwesome via the theme? Then you might also be able to use icons from other FA series.
fsize
Is your theme based on the Bootstrap CSS framework? You can then use the value to determine how large the form fields and buttons should be. Possible values are “lg” or “sm”.
newsletter
Would you like to place a separate checkbox in your form for subscribing to the newsletter? Then enter a “y” for this attribute. By default this option is off.
container_class
This value is used for a CSS class at the outer DIV container created by the shortcode. Enter a value for this if you want to determine your own CSS style based on this.
form_class
If your theme supports the Bootstrap CSS framework, you can display a horizontal form with the default value “form-inline”. If you don’t want that, enter an empty value or your own CSS class name.
source
You can use the “source” field with the mailing list in EmailOctopus. The value you enter in the shortcode is then stored with the subscriber in EmailOctopus.
tags
Add comma separated tags. Use exact the same strings as in EmailOctopus.
extra_fields
This option allows you to add extra fields to your form. Please note, you can only use the field names (not labels) that you have entered in the plugin settings screen. The additional fields are shown after the email address field, in the same order as you enter them in the shortcode. Do you use “LastName” as an extra field? This will be shown between the first name and email address fields.
hidden_fields
Do you want to add static information to your mailing list? This is possible with hidden fields. You enter the name and value for a hidden field as follows: name|value. You can enter multiple name/value combinations by separating them with a comma. Don’t forget to also create the fields in EmailOctopus.
clicky
Do you want to specify a separate goal for a form from Clicky? This can be done via this option. By default, the value you entered via the settings screen is used here or not if you haven’t entered a value before.
cookie_name
Do you want a cookie to be placed after sending a form? You can then specify the name for this cookie via this attribute. By default, a cookie named fw_eo_subscribed is created. The cookie has the value “yes” and is valid for 365 days.
form_only
With this option you can determine whether only the form is shown or also the title and text. By default this option is set to “n”. Set it to “y” if you want to show only the form.
You can place the shortcode via the shortcode block of the Block Editor, via the Classic Editor or via the Elementor shortcode widget.
For developers
The plugin currently has two filter hooks that allow you to manipulate the behavior of the plugin.
fweo_emailoctopus_show_static
Use this hook to display the static plugin files on specific pages.
fweo_add_extra_data_fields
With this hook you can add extra fields/values to a subscription.
